Noveo developer Egor shares step-by-step instructions on how to avoid possible issues when working with .NET apps and SQL Servers across multiple environments.
Before we start
![]()
Quite often, developers are required to install and configure various applications, services and technologies in order to be able to work on their projects locally. When there’s only one product and the whole team uses the same version of .NET or, for example, everyone works on Windows, setting up a project shouldn’t really pose any problems. But, what if you need to constantly switch between different versions of Java / PHP / Node.js / what have you, all the while one of your teammates has Windows and the other one – Linux?
Of course, it’s possible to create various setup and installation guides tailored to each particular case, however, that won’t really solve the main problem: your operation system’s being isolated from the app’s environment. After you delete the previously installed version of .NET and/or SQL Server, there may still remain some random configuration files that, in turn, may lead to an error when you try to run a different version of the application.
Using Docker / Docker Compose can help you to avoid this – and similar – kind of issues, and to work with .NET apps and SQL Servers across multiple environments rather freely.
1. Installing Docker / Docker Compose
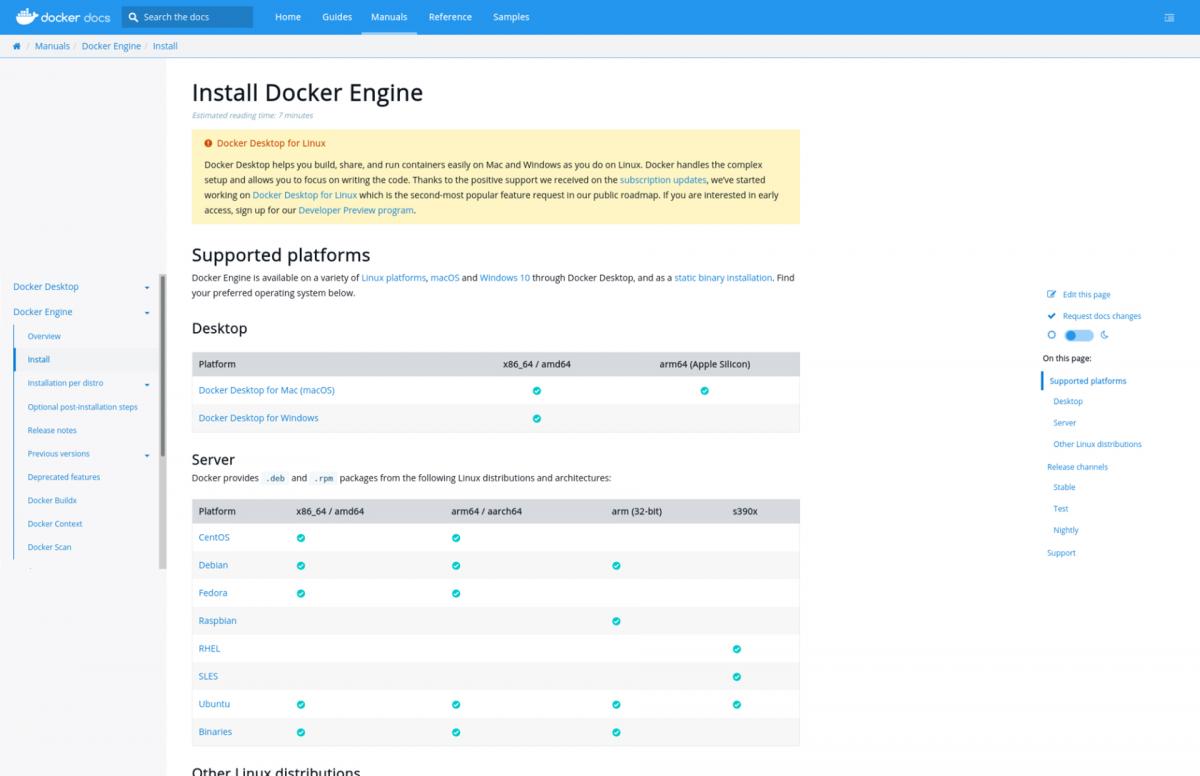
To install Docker, go to the Install Docker Engine page and open the guide for the operational system of your choice.
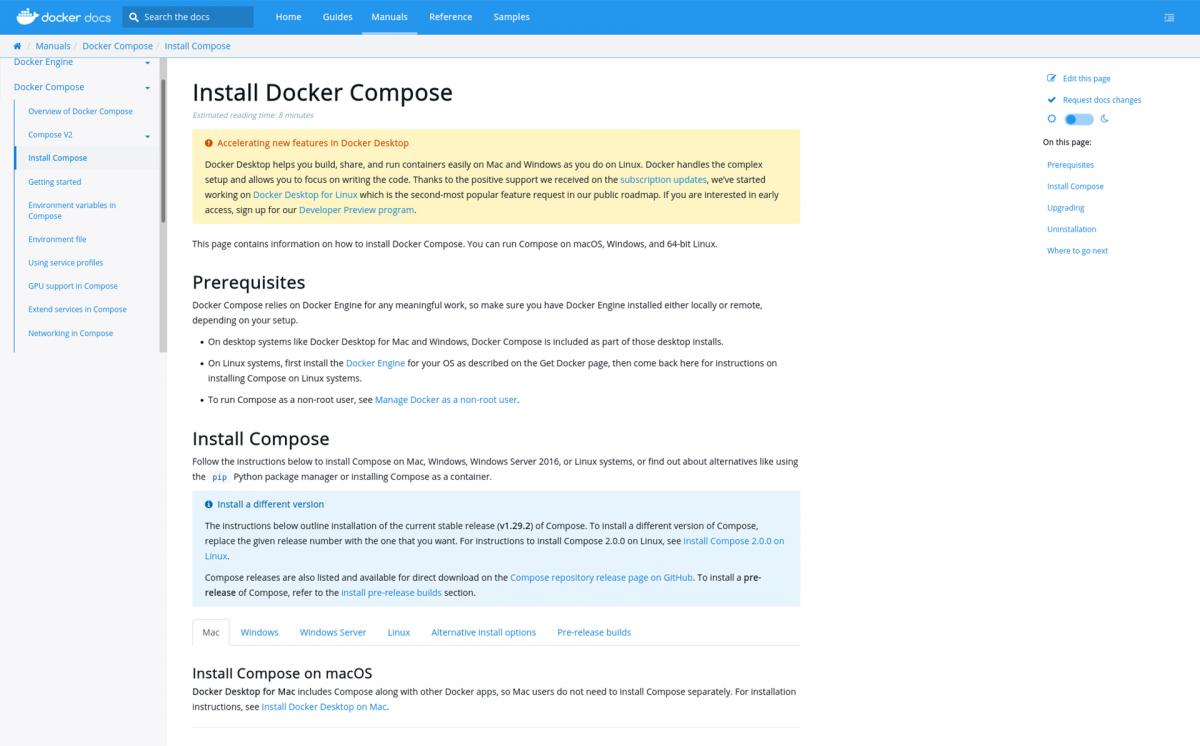
To install Docker Compose, go to the Install Docker Сompose page instead – and once again, open the guide for the operational system of your choice.
Let’s check if Docker / Docker Compose works by executing the following commands in the console:
$ docker-compose -v
docker-compose version 1.28.6, build unknown
$ docker-compose --version
docker-compose version 1.28.6, build unknown
2. Creating a project directory structure
If the project I’m working on involves Docker, I tend to stick to the following structure:
- src – project’s source code,
- docker:
- api – directory with configuration files as well as a dockerfile with command-line instructions to assemble the .NET application’s image,
- db – directory with migrations, configuration files, and a dockerfile for building the SQL Server’s image,
- docker-compose.yml – file defining services, networks, and volumes for a Docker application.
3. Creating Docker files for .NET, SQL Server
3.1. Configuring the Docker image for a .NET application
To work with a .NET app, create a Dockerfile in the project directory with the path docker/api/Dockerfile:
FROM mcr.microsoft.com/dotnet/aspnet:3.1-focal AS base
WORKDIR /app
EXPOSE 5000

ENV ASPNETCORE_URLS=http://+:5000
ENV ASPNETCORE_ENVIRONMENT Development

# Creates a non-root user with an explicit UID and adds permission to access the /app folder
# For more info, please refer to https://aka.ms/vscode-docker-dotnet-configure-containers
RUN adduser -u 5678 --disabled-password --gecos "" appuser && chown -R appuser /app
USER appuser

FROM mcr.microsoft.com/dotnet/sdk:3.1-focal AS build
WORKDIR /src
COPY ["./src/app.csproj", "/src"]
COPY ["./nuget.config", "./"]
RUN dotnet restore "app.csproj"
COPY ./src .

WORKDIR "/src"
RUN dotnet build "app.csproj" -c Release -o /app/build

FROM build AS publish
RUN dotnet publish "app.csproj" -c Release -o /app/publish

FROM base AS final
WORKDIR /app
COPY --from=publish /app/publish .
ENTRYPOINT ["dotnet", "app.dll"]
3.2. Configuring the Docker image for an SQL Server
To work with an SQL Server, create a Dockerfile in the project directory with the path docker/db/Dockerfile and the contents:
FROM "mcr.microsoft.com/mssql/server:2019-CU13-ubuntu-20.04"

ENTRYPOINT [ "/opt/mssql/bin/sqlservr" ]
3.3. Configuring the Docker image for Flyway
To work with sql migrations,
3.3.1. create a Dockerfile in the project directory with the path docker/db/migrations/Dockerfile and the contents:
FROM flyway/flyway:8.0.4-alpine

COPY ./*.sql /flyway/sql/
COPY ./flyway.conf /flyway/conf/

ENTRYPOINT [ "flyway", "migrate" ]
3.3.2. create a configuration file docker/db/migrations/flyway.conf with the contents:
flyway.url=jdbc:sqlserver://mssql-db
flyway.user=sa
flyway.password=Your_password123
flyway.mixed=true
3.3.3. create a migration file in the following directory – docker/db/migrations/V1__DatabaseCreation.sql, with the contents:
USE [master]
GO

CREATE DATABASE [TEST]
GO

USE [TEST]
GO

SET ANSI_NULLS ON
GO
SET QUOTED_IDENTIFIER ON
GO

CREATE SCHEMA data AUTHORIZATION dbo;
GO

CREATE TABLE [dbo].[test](
 [Id] [int] NOT NULL,
 [Name] [varchar](30) NOT NULL
) ON [PRIMARY]
GO
INSERT INTO [dbo].[test] ([Id], [Name])
 VALUES (1, 'User1')
GO
You can find more information on how to work with migrations via Flyway here.
4. Creating a docker-compose.yml file
Finally, the only thing left to do is to create a docker-compose.yml file in order to describe all required services:
- db – service for working with MS SQL Server,
- db-migration – service for working with Flyway migrations,
- api – service for working with .NET apps.
Create a docker-compose.yml file in the project directory with the path docker/docker-compose.yml and the following contents:
version: "3.4"
services:
   api:
       build:
           context: "../"
           dockerfile: ./docker/api/Dockerfile
       container_name: "api"
       ports:
           - "5000-5001:5000-5001"
       depends_on:
           - db
           - db-migrations
       networks:
           - app-network
   db:
       build:
           context: "./db"
       container_name: "db"
       environment:
           SA_PASSWORD: "Your_password123"
           ACCEPT_EULA: "Y"
       ports:
           - "1433:1433"
       networks:
           - app-network
   db-migrations:
       build:
           context: "./db/migrations"
       container_name: "db-migrations"
       volumes:
           - ./db/migrations:/flyway/sql
       networks:
           - app-network
       depends_on:
           - db
networks:
   app-network:
       driver: bridge
5. Launching the application
To launch the application, run Docker containers using the docker-compose command. From the project directory, execute the command in the terminal as shown below:
cd ./docker && docker-compose up -d --force-recreate --buildOnce you’re done, you should be able to open the app in a browser at http://localhost:5000.
As for the SQL Server, you can connect to it by using the command:
sqlcmd -S db -d TEST -G -U saand entering the password Your_password123.
Useful links