How to make sure that your usage of Git fully complies with the latest standards and best practices in the field? How to generate and organise your changelogs in a meaningful way? How to check whether your versioning is correct, and on top of that, link your commit to a corresponding GitHub/GitLab issue?
Of course, there are a number of rules that you can learn by heart and follow in your day-to-day work, but it surely wouldn’t hurt to try and automate the whole process, right? Inspired by an idea behind this Node.js-based tool, I wanted to take it a bit further and develop a similar solution in Golang – with a couple of new features added, and implemented in a way that, ultimately, would make it CI pipeline-friendly.
The product that resulted from this project of mine is called AutoGit, and I’m glad to present it to you in this article!
Description
AutoGit is a CI-friendly tool that automatically follows the rules of Conventional Commits (the standard used for making Git commits more descriptive), generates changelog files with an explicit list of new features and bug fixes, and also calculates the correct semantic version number that should be assigned to your next product release.
Essentially, AutoGit helps you to decrease the toll associated with the preparation of release documentation, and allows you to start writing clearer, more descriptive commits.
Features
Some of the main AutoGit features include:
- validation of conventional Git commits (and a number of other ones, as an option) using a pre-commit hook;
- validation of your commit history upon an
autogit changelog --validaterequest; - automatic calculation of the next semantic version of your product;
- automatic generation of changelogs documenting all of the new features and bug fixes included in your next product release;
- when you create a tag using
autogit version --tag --other-flags, a changelog gets automatically added to an annotated Git tag; - CI-friendly binary file that doesn’t depend on the OS nor on a project’s architecture;
- includes a built-in Git, which means that you don’t have to install Git additionally in order for the tool to work.
Compiled for
linux-amd64linux-arm64linux-386linux-armwindows-amd64windows-386.exewindows-arm64.exewindows-arm.exemacos-amd64macos-arm64
Support
First tier support – issues can solved on our own:
- for Linux and CI usage
Second tier support – issues may be solved on our own:
- for Windows
Third tier support – only compiled, and accepting bug fixes that were implemented by project contributors:
- for MacOS
Installation
- Download the latest stable release of AutoGit and put its binary file into a searchable
env PATHrange.
- Linux:
- Check your searchable
PATH binlocations usingecho "$PATH"and put the file into any of them, or add a new location and change its settings so it can be executed viachmod; - I’d also recommend to add it to
/usr/local/bin; - Linux Ubuntu one liner:
curl -o /usr/local/bin/autogit https://github.com/darklab8/darklab_autogit/releases/download/v1.0.0/autogit-linux-amd64 && chmod 777 /usr/local/bin/autogit.
- Check your searchable
- Windows:
- Check your
PATH binlocations usingecho %PATH%and put the file into any of them, or add a new location and add it there. Make sure to rename the binary file, for example, fromautogit-windows-amd64.exetoautogit.exe; - If you use
Git Bash, I’d recommend to put the file into~/binin order to use it only inGit Bash, or intoC:\Program Files\Git\cmdin order to work with it in any terminal; - You can also add it to any other searchable
PATH binlocation, or add a new searchable location entirely.
- Check your
- Copy
autogit.ymlfrom the same binary executable file you’ve downloaded, and place it in the root of your Git project folder. Adjust the settings according to the specifics of your repository. - Run autogit hook activate in order to create a .git-hook folder, and enable it in your Git repository settings.
P.S. My current project repository also runs on the configured AutoGit :)
Use cases
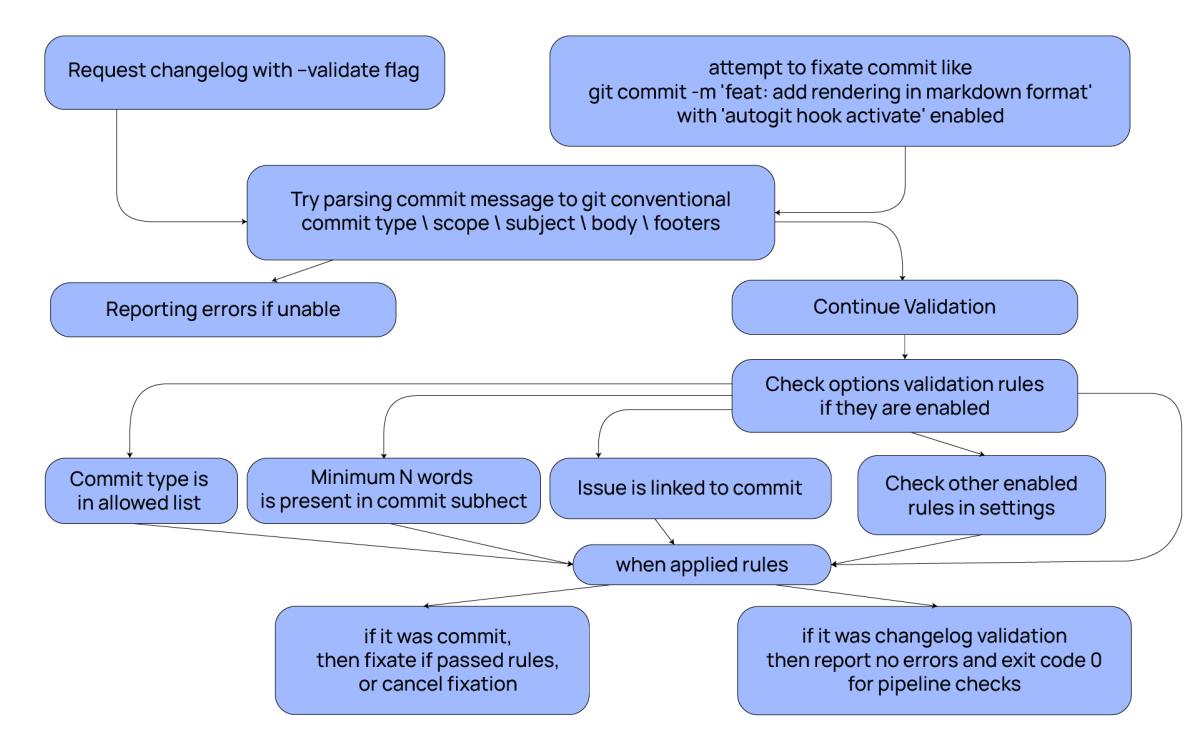
Scenario #1: Validator. Validating Git commits / changelogs
When you write a Git commit -m ‘feat: add rendering in markdown format’, a Git hook gets activated and tries to parse the name of your commit according to the Conventional Commits standard. If it’s unable to do so, the tool will return an error and prevent you from pushing the commit.
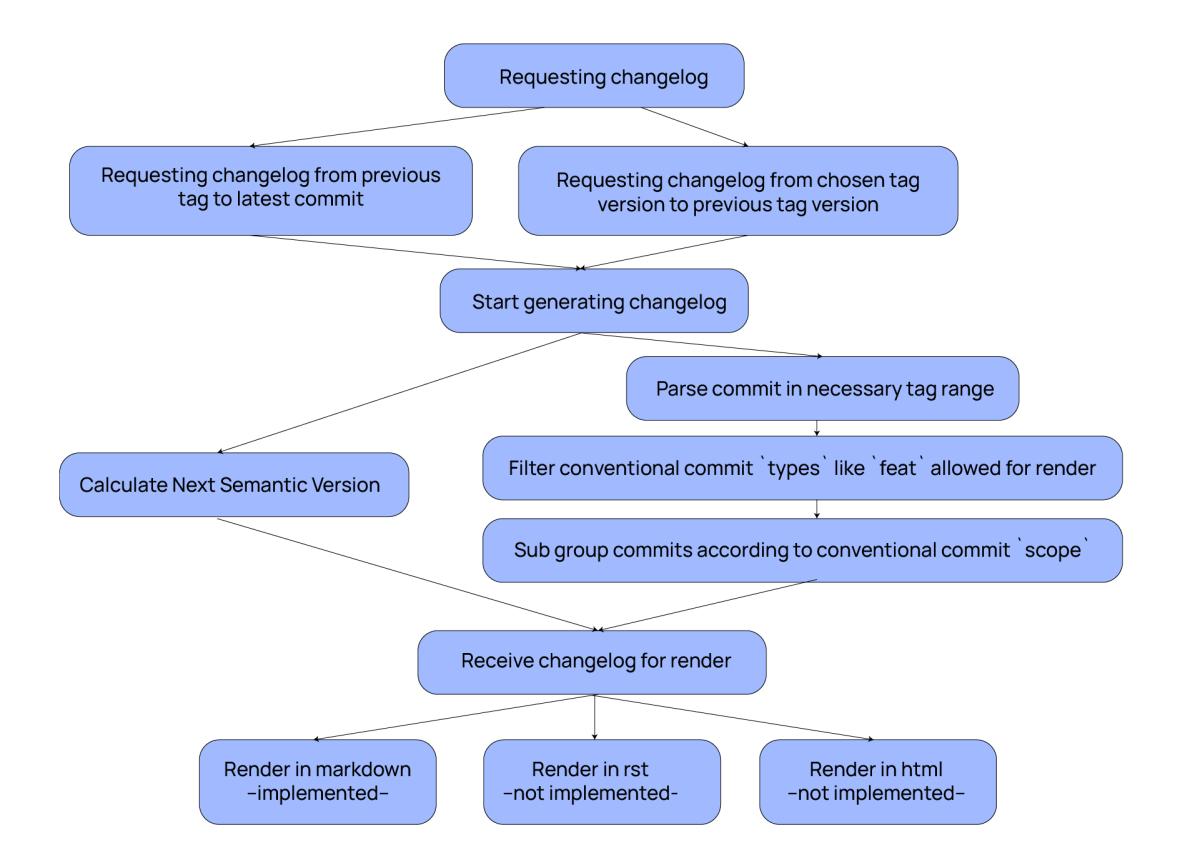
Scenario #2: Changelog. Viewing the changelog of new features, bug fixes, and other code modifications
Used in cases when you need to auto-generate a changelog file with the latest features, fixes, etc. that were implemented.
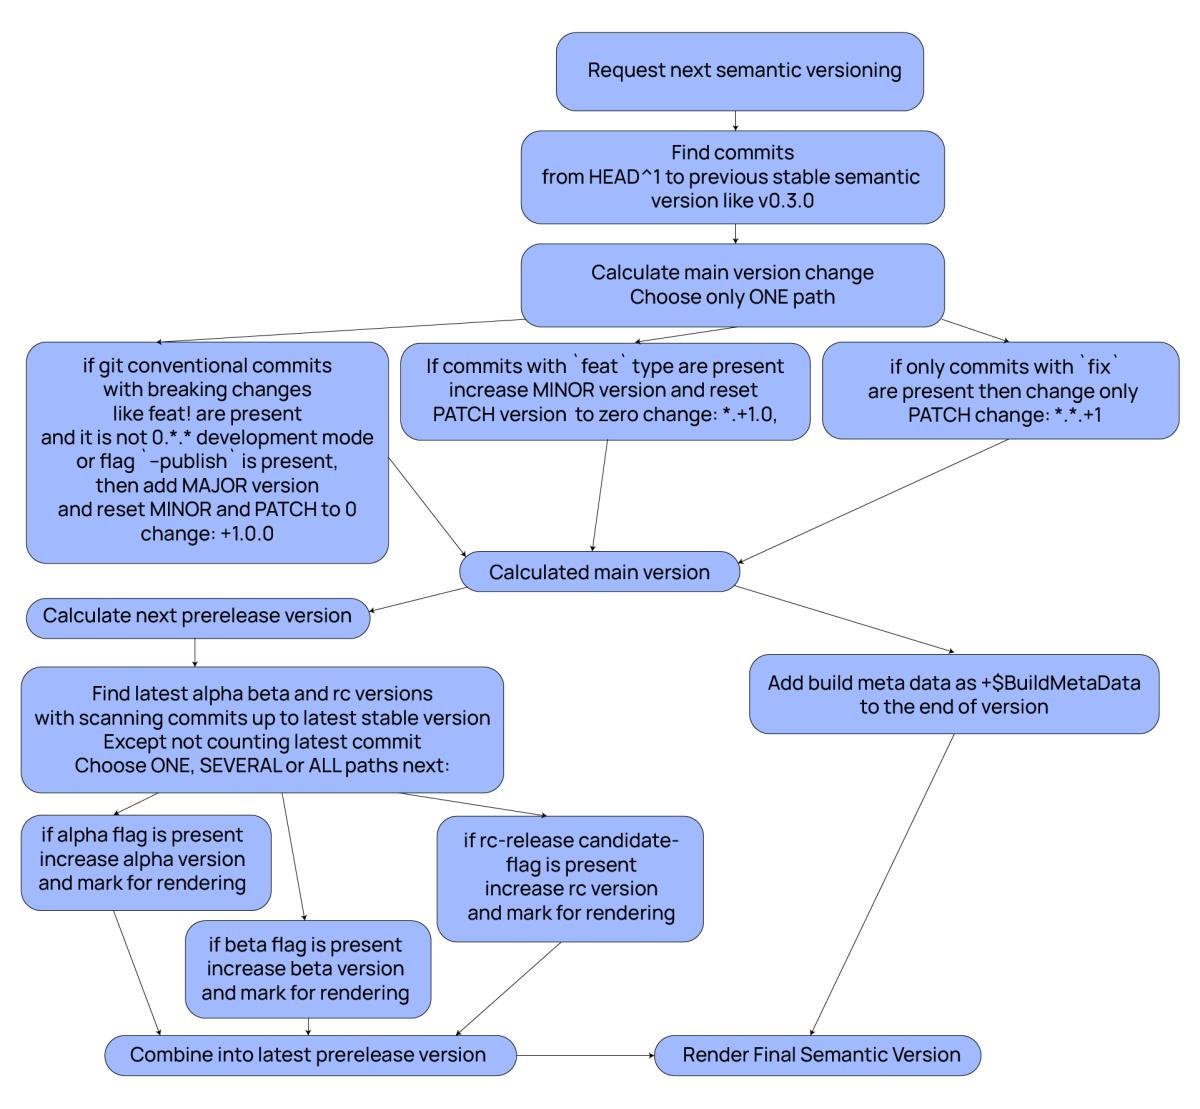
Scenario #3: nextSemVer. Checking which semantic version / tag should be assigned to your next release
The tool checks whether you’ve made any commits or, for example, only performed some refactoring and adjusted code styling.
- if there are no code changes detected, the next version will have the same number as the previous one (e.g. version
0.0.1in both cases); - if there was a fix, the PATCH version number will go up (e.g.
0.0.2as the next semantic version of0.0.1); - if you made a
featrequest, the MINOR version number will go up instead (e.g.0.1.0and not0.0.1); - if there are some changes that are not backwards-compatible and break the previously implemented functionality, the MAJOR version number will be increased (e.g.
1.0.0, with an indication for users –feat!orBREAKING CHANGE:); - if you had no previous versions of your projects, the program will calculate the needed number as “
0.0.0+ the number of changes detected”.
This is how the algorithm works in more detail (taking into account the calculations for pre-release versions):
TLDR
So, in a nutshell, AutoGit spares you the effort of adhering to sometimes-complex standards of Conventional Commits and semantic versioning. You are auto-guided and auto-corrected in your coding process and only have to make sure that the meaning / subject / description you add to your commits stays true to reality :) Plus, since you can see what kind of text gets rendered for the end users of your product, you can quickly learn how to improve your release documentation writing skills along the way. And of course, the solution is CI pipeline-friendly!
Dev requirements
- Cobra generator
- Cobra guide
- GoDoc
- Add automatic godoc detection and discovery of binary files for
cobra-cli: export PATH="$PATH:/usr/local/go/bin:$HOME/go/bin" - Install the latest stable version of AutoGit ;)
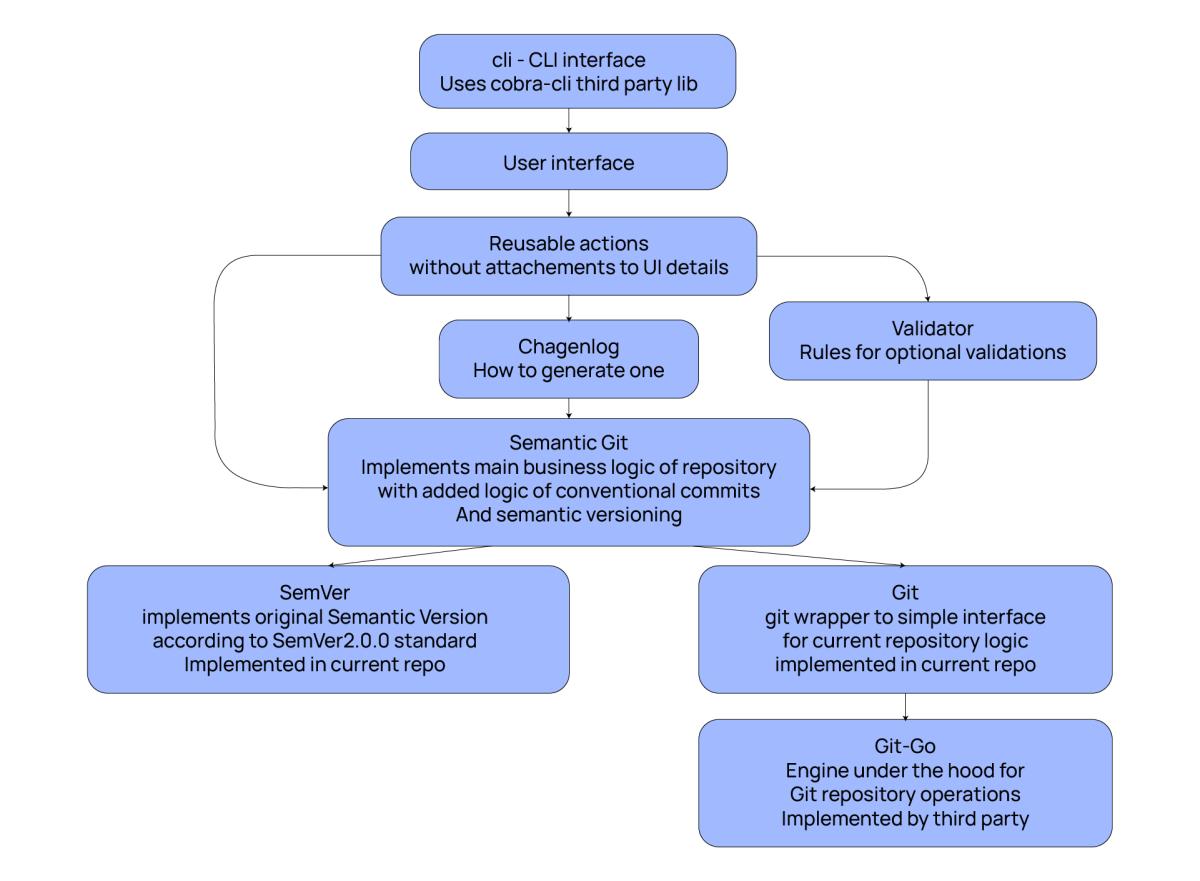
Code architecture