A little bit of theory
An SSL certificate (with SSL standing for Secure Sockets Layer) is a digital certificate that allows you to verify that the server responsible for transmitting data to the client 1. has not been tampered with, and 2. is actually the one that sent you the data.
A typical SSL certificate consists of:
- a private key, which is kept secret and helps the server to encrypt data;
- a certificate itself along with a public key, which allows the client to decrypt received data.
If there is no private key, it is practically impossible to encrypt any data in a way that would enable the client to decode it with their corresponding public key.
The most important information contained in an SSL certificate concerns the organisation to whom it was issued, or in other words, the domain name. Other details encoded in a certificate can include issuer data, that is, some information about the authority that signed the server’s certificate – including a digital signature that can only be generated by a holder of the issuer’s certificate’s private key. Like that, the issuer is the only “entity” that can generate and sign a valid SSL certificate.
As a client, you can consider the connection secure if, in the course of following a certificate chain, you reach a certification authority’s “trusted root certificate” embedded into your system or browser, which, in turn, proves to be self-signed.
Why do you need an SSL certificate?
When programming locally, you may come across a number of applications that require a valid SSL certificate, namely:
- PWA, or progressive web applications,
- applications that involve WebRTC technologies.
Generating a valid SSL certificate
To get a valid SSL certificate, you can pick and follow one of these routes:
- Generate a self-signed certificate and install it in the Trusted Root Certification Authorities store, so that your device can interpret it as a valid certificate. As suggested by its name, a self-signed certificate is a certificate that has been signed using its own private key.
- Generate a root certificate and install it in the Trusted Root Certification Authorities store, then generate a certificate for your server and sign it using the previously-created root certificate.
Getting started
First, you will need to install OpenSSL (binary files for Windows can be found here).
openssl.cfg configuration file
[ req_distinguished_name ]
countryName         = CO
stateOrProvinceName = ST
localityName        = ST
organizationName    = O

####################################################################
# Extensions for when we sign normal certs (specified as default)
[ usr_cert ]
basicConstraints = CA:false
subjectKeyIdentifier = hash
authorityKeyIdentifier = keyid,issuer
subjectAltName = email:move

####################################################################
# Same as above, but cert req already has SubjectAltName
[ usr_cert_has_san ]
basicConstraints = CA:false
subjectKeyIdentifier = hash
authorityKeyIdentifier = keyid,issuer

####################################################################
# Extensions to use when signing a CA
[ v3_ca ]
subjectKeyIdentifier = hash
authorityKeyIdentifier = keyid:always,issuer:always
basicConstraints = CA:true
subjectAltName=email:move

####################################################################
# Same as above, but CA req already has SubjectAltName
[ v3_ca_has_san ]
subjectKeyIdentifier = hash
authorityKeyIdentifier = keyid:always,issuer:always
basicConstraints = CA:true

[ req ]
prompt             = no
default_bits       = 4096
distinguished_name = req_distinguished_name
req_extensions = req_ext

[ req_ext ]
subjectAltName = @alt_names

[ alt_names ]
DNS.0 = example.com
DNS.1 = *.example.com
Generating a self-signed certificate
1. Generate a private key:
mkdir example.com
openssl genrsa -out example.com/example.com.key
You get:
Generating RSA private key, 2048 bit long modulus (2 primes)
........................+++++
..........................................................+++++
e is 65537 (0x010001)
2. Create a certificate signing request:
openssl req -new -key example.com/example.com.key -out example.com/example.com.csr -config openssl.cfg -subj "/CN=example.com certificate"3. In the configuration file openssl.cfg, locate the [alt_names] block and type in the name(s) of your domain. Previously, the solution only supported one name – the one declared in the CN field – but now it became possible to write down multiple different names, and even create a so-called wildcard certificate for all of your subdomains:
[ alt_names ]
DNS.0 = example.com
DNS.1 = *.example.com
4. Generate a certificate:
openssl x509 -req -in example.com/example.com.csr -extensions
req_ext -extfile openssl.cfg -signkey
example.com/example.com.key  -out example.com/example.com.crt
-days 1825
Check the result:
openssl x509 -in example.com/example.com.crt -textYou get:
Certificate:
    Data:
        Version: 3 (0x2)
        Serial Number:
            0f:63:6b:b8:76:27:71:d1:e9:f3:53:01:11:11:7c:52:d6:c7:ea:c6
        Signature Algorithm: sha256WithRSAEncryption
        Issuer: CN = example.com certificate
        Validity
            Not Before: Sep 27 05:08:48 2022 GMT
            Not After : Sep 26 05:08:48 2027 GMT
        Subject: CN = example.com certificate
        Subject Public Key Info:
            Public Key Algorithm: rsaEncryption
                RSA Public-Key: (2048 bit)
                Modulus:
                    00:c9:...:3b:24:
                    26:0f
                Exponent: 65537 (0x10001)
        X509v3 extensions:
            X509v3 Subject Alternative Name:
                DNS:example.com, DNS:*.example.com
    Signature Algorithm: sha256WithRSAEncryption
         20:a9:...:fe:fd:
         5f:30:e8:4a
-----BEGIN CERTIFICATE-----
MIIC+zCCAeO…8w6Eo=
-----END CERTIFICATE-----
And so, you now have the certificate itself (example.com.crt), and the key file to go along with it (example.com.key) – both of which can be used in your applications.
Generating a root certificate + a server certificate
1. Generate a private key for a root certificate:
mkdir ca
openssl genrsa -out ca/ca.key
You get:
Generating RSA private key, 2048 bit long modulus (2 primes)
...........................................+++++
...................................+++++
e is 65537 (0x010001)
2. Create a root certificate:
openssl req -x509 -new -key ca/ca.key -days 1825 -out
ca/ca.crt  -extensions v3_ca_has_san -config openssl.cfg -subj
"/CN=Root CA"
3. Follow the steps 1 through 5 from the instruction above (Generating a self-signed certificate).
4. Generate a server certificate that will be signed by your root certificate:
openssl x509 -req -in example.com/example.com.csr -C
 ca/ca.crt -CAkey ca/ca.key -CAcreateserial -extensions req_ext
-extfile openssl.cfg -out example.com/example.com.ca.crt -days
1825
5. Check the result:
openssl x509 -in example.com/example.com.ca.crt -textYou get:
Certificate:
    Data:
        Version: 3 (0x2)
        Serial Number:
            27:f4:ec:08:a8:36:b8:38:81:53:d9:8f:b5:fe:91:13:79:f0:9e:dc
        Signature Algorithm: sha256WithRSAEncryption
        Issuer: CN = Root CA
        Validity
            Not Before: Sep 27 05:46:19 2022 GMT
            Not After : Sep 26 05:46:19 2027 GMT
        Subject: CN = example.com certificate
        Subject Public Key Info:
            Public Key Algorithm: rsaEncryption
                RSA Public-Key: (2048 bit)
                Modulus:
                    00:c9:...:26:0f
                Exponent: 65537 (0x10001)
        X509v3 extensions:
            X509v3 Subject Alternative Name:
                DNS:example.com, DNS:*.example.com
    Signature Algorithm: sha256WithRSAEncryption
         9e:72:...:57:17
-----BEGIN CERTIFICATE-----
MIIC…JXFw==
-----END CERTIFICATE-----
As a result, you get two key-certificate sets: the server certificate example.com.crt with its key example.com.key, and the root certificate ca.crt with its key ca.key.
So now, if the root certificate you’ve created gets installed in the Trusted Root Certification Authorities store of your system and/or browser, all of the certificates signed using this root certificate will automatically become valid.
Installing a root certificate on Windows (Chrome)
Google Chrome uses your operating system’s certificate store, which makes the certificate installation process quite straightforward:

Installing a root certificate in Firefox
Mozilla Firefox, on the other hand, has its own certificate store – so, in order to install a root certificate there, you should do the following:


You may have to disable the DNS over HTTPS option in your browser’s connection settings, so that it would use the system’s DNS instead – which, in turn, is linked to the hosts file (a bit more about it later):


Example: Using a certificate with create-react-app
1. Add the following variables to your .env:
HTTPS=true
SSL_CRT_FILE=certs/example.com.crt
SSL_KEY_FILE=certs/example.com.key
HOST=example.com
2. Open the hosts file (Windows – C:\Windows\System32\Drivers\etc\hosts, Ubuntu – /etc/hosts) and add the following entry:
192.168.2.116 example.comBy doing so, you make the system resolve your domain name example.com locally (to find your PC’s local IP address, make sure to check Network Settings).
3. Finally, launch the application – as you can see, the connection is secure, and you have a valid SSL certificate:

Working with SSL certificates on mobile devices
Now, let’s take a look at how you can install an SSL certificate on Android and test your application on a mobile device.
Installing a root certificate on Android
1. Make sure that your PC and mobile device are connected to the same local network.
2. Use create-react-app.
3. Place your ca.crt certificate in the public folder.
4. Add the local IP address of your computer to .env:
HOST=192.168.2.116
5. Launch create-react-app without https.
6. On your mobile device, open http://192.168.2.116:3000/ca.crt and install the certificate:

Adding a domain name on Android
In order to be able to test your application on a mobile device, you need to make sure that the domain name you’ve created is resolved to the local IP address of your computer.
To do so, you can do one of the following:
1. If you have root access on your mobile device, simply edit the hosts file.
If you don’t have the access, you can use an app called Postern – it’s a VPN server launched directly from your smartphone that can not only modify your device’s network traffic, but intercept and respond to DNS queries as well. Using Postern, you can easily map the domain name example.com to your computer’s local IP address – just like this (don’t forget to have webpack-dev-server running in your local network):
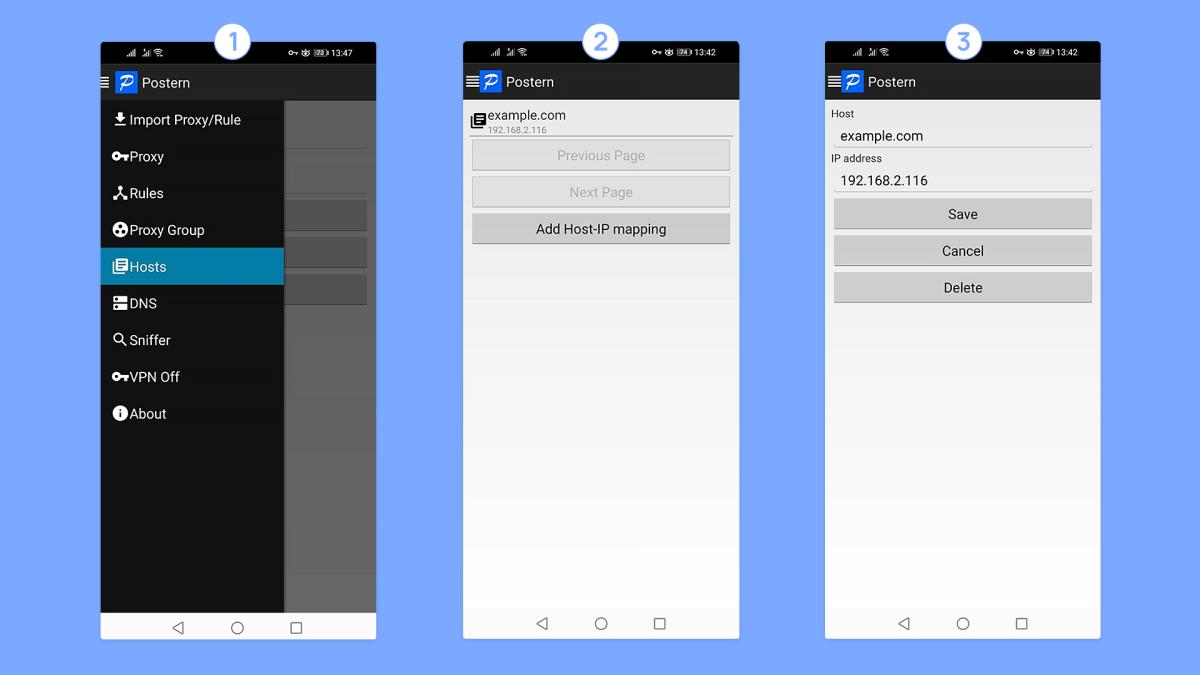
To check whether Postern is running at any given moment, take a look at the right-hand corner of your smartphone’s status bar – a small key (or sometimes a lock) icon indicates that you have VPN enabled, and all requests are currently going through Postern.
Once the mapping is done, you can try and open your application in a mobile browser:

And voilà! Now you know a little bit more about SSL certificates – and since you’ve just learned how to generate and install them, you can put all this new knowledge into practice on your own projects! :)